For a background on the diffusion process that has been implemented please see this post on collaborative diffusion.
I am also assuming the user has some prior knowledge of parallel programming or CUDA development. An excellent book on the subject that i would recommend reading is CUDA by example by Jason Sanders and Edward Kandrot
Sequential Implementation
Before we can start calculating our diffusion values in order to find paths from our agents to our goals we first need to some way to store our values. For this we use three, 2 dimensional vectors. One to store our input grid, one for the output grid and one that contains the goals we will be seeking. Optionally we can also have a fourth grid that contains walls and obstacles.

Once we have our grids set up with the values all initialised to zero and our goal tile set to an arbitrarily high value, (in our case the centre tile is set to 1024) we can then begin the diffusion process.
This process follows three simple steps; First we copy our goal values into the input grid (line 128), we then diffuse the 'scent' of our goal value across our grid storing our newly calculated values in the output grid (line 131) and finally we swap our input and output grids ready for the next iteration.

Setting our goals is a very simple process, all we need to do is loop through our goal grid and find which values do not equal zero and set the corresponding tile in the input grid to our goal value.

Our diffusion process is a little more involved and is the most computationally heavy process we have. In order to diffuse the grid we need to loop through every tile in the grid and calculate its new value. This is done by taking the value of the left, right, top and bottom neighbours and computing the average of the tiles (Line 42) and storing the new value in the output grid.


Finally we swap the input and output grids ready for the next iteration using the swap() method provided by the C++ library.
And there we are, we have run one iteration of our diffusion process! If we print the values from our output grid to a .csv file we get something that looks like this.

As we can see our values are starting to diffuse out from our goal tile and spread across the grid but after one iteration we still cant find a path to our goal unless we are standing right next to it so we need to run our diffusion process a few more times.

Starting to get there....just few more times.

In this example after 10 iterations we can now find a path from anywhere in our grid, although the number of iterations needed to fill the grid depends on the size of the grid.
In the image below the red squares represent agents placed around our grid, by moving to the neighbouring tile with the highest diffusion value we can find a path back to our goal tile from any position in the grid.

One of the benefits of being able to find a path from anywhere in the grid is that if our goals are static we only need to calculate the values once and we can store them in a look up table for our agents to use.
Parallel Implementation
Our parallel implementation mostly follows the same process as our sequential version, the only real differences are we now need to change the code so that it can be run on the GPU. To do this we are going to use CUDA C/C++.
Like before the first thing we need to do is create variables for holding our three grids and allocate the memory for them on the GPU.


Once we have this we then create a temporary variable on the CPU which we use to initialise all the values in the grid to zero and set our initial goal values. Again we use the centre tile in the grid and set the value to 1024. We then copy our temporary variable from our CPU into our three variables stored on the device.

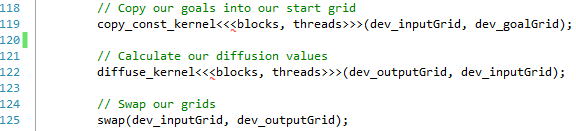
After all our memory is set up on the GPU we can now call our kernels to run our diffusion process. Like the sequential version we follow the same three steps as before. First we copy our goals into our input grid (Line 119). Secondly we calculate our new diffusion values (Line 122) and finally we swap our input and output grids ready for the next iteration (Line 125).
Our copy_const_kernel follows the same idea as setting our goals did in the sequential version. However this is where the power of parallelization begins to come in as we now no longer need to loop through our entire grid, instead we simply find which tile in the grid the thread is working on and check to see if that tile contains a goal value. If it does we set the goal at this position in the input grid.

The diffuse_kernel again works in a very similar way, we find the tile we are working on and then get the diffusion values for the left, right, top and bottom neighbours before computing an average and setting this to the value of the corresponding tile in the output grid.

Finally we swap our input and output grids using the swap() method from the C++ library like we did before.
The final step we need to take into consideration when programming for the GPU is getting our values back onto the CPU once we are finished processing. After we have run our diffusion process for our desired number of iterations we can now pass our data back and store it again in our temporary variable and use it in anyway we wish.
Time Differences
Overall there is not much difference from our sequential version in terms of the process that we follow and even the amount of code that we have to write. The biggest difference between the applications only becomes noticeable when we start to measure the performance.
For each of the applications we have measured the time taken to run one iteration of the diffusion process, this involves copying our goals into the input grid, calculating the new values and swapping the input and output grids. This process has been run 100 times and an average time has been taken.
The applications have been run on grids of 32x32, 64x64, 128x128, 256x256, 512x512, 1024x1024 and 2048x2048.

Looking at the timings for the different grid size of the sequential version we can see that as the grid size increases so does the time taken to process all the nodes, starting at 0.73ms for a 32x32 grid and moving up to 3 seconds for a grid size of 2048x2048.
Initially this doesn't seem to bad at first glance but we need to remember that we cant find paths from everywhere in our grid until the 'scent' of our goal has spread to every tile. Based upon testing with the parallel implementation it takes at least 40,000 iterations to fill the entire grid so that every tile has a non zero value for a grid of size 2048x2048, This would mean it would take at least 33 hours before we could find all our paths! Ain't nobody got time for that!

Looking at our parallel times we can see that it follows the same trend as before with our larger grids taking more time to process. However when we look at our actual times we can see a massive difference in speed compared to our sequential versions.
For our parallel implementation it only takes us 2.44 ms to run our diffusion process for the 2048x2048 grid compared to the 3000 ms of the sequential version. This is also faster than the sequential version for the 64x64 grid even though the 2048x2048 grid is 32 times larger in size!
This also means that we are able to find all paths to our goal a lot quicker in parallel for our 2048x2048 grid. Considering that it takes at least 40,000 iterations so that all tiles have a non zero value it would only take 97 seconds to find all paths in parallel compared to 33 hours if we done it sequentially. Although still not quite real time it is a lot better!
No comments:
Post a Comment